
You may feel perfectly in tune when you sing a phrase alone, then find that your entrance wobbles or your breathing shifts as soon as a backing track starts. That is why recording with accompaniment is less about making a finished cover and more about checking where your voice sits inside the actual song. In the Takes and backing panel of MusicalBoard Singing Recorder, you can load a backing file from your device, choose its starting position, and have it play as you begin recording. This article explains how to make short vocal takes clearly and safely with Load backing, the cue gauge, Play under take, Voice only, and Mix into take.
What recording with a backing track can reveal
Singing without accompaniment is useful for holding one note or listening closely to vowel quality. In an actual song, however, the first drum beat, a chord change, or a gap in the arrangement changes how a phrase begins and ends. A line that needs a breath just before the beat — such as the first line of a pop-ballad chorus — is often much easier to sing late over accompaniment than on its own.
The goal is not to sing louder than the backing track. For each take, it is enough to check one of these things:
- Whether the first consonant lands before or after the beat
- Whether a sustained vowel stays stable through a chord change
- Whether an inhale interrupts the next phrase
- Whether the sound becomes small or delayed just before a high note
Limiting yourself to one listening target makes it much easier to change the next attempt immediately. For the basic workflow of recording a take, replaying a specific section, and comparing attempts, start with Upload, Play Back, and Compare Vocal Takes in the Browser.
Before you start: the backing file and headphones
The backing track in Singing Recorder is a local file selected from your device. Open the panel, select Load backing, and choose the accompaniment file you want to practice with. Loading a file does not send the backing track or your microphone audio to MusicalBoard servers. Playback, recording, and pitch analysis stay in the browser.
If you play the backing through speakers with the microphone on, the microphone can easily pick it up as well. The accompaniment may leak into the take, and monitoring can create feedback. Use wired headphones or headphones with low latency, and begin with the backing volume low. For how real-time monitoring works and why latency matters, see Hearing Your Own Voice While Recording.
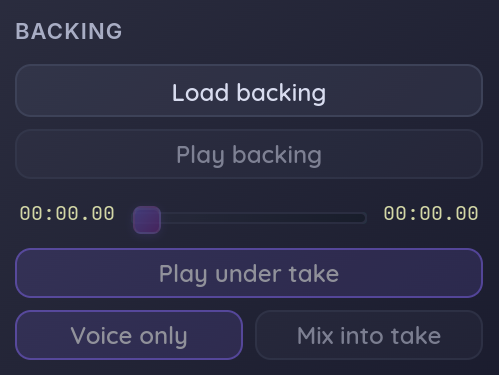
After loading a backing track, set the phrase cue first, then choose how the take should be saved.
Use the cue gauge to set where the phrase begins
After you load a file, a gauge beneath its name lets you move through the backing track. It is not simply a preview progress bar. It sets the time where the accompaniment will begin for the next take — your cue point.
If you are practicing only the second-verse chorus, you do not need to wait through the song from the beginning every time. Put the gauge one or two bars before the chorus, press Play backing, and make sure you have enough room to take the breath you need before the first line. If the vocal begins on beat three, it is usually more useful to cue the backing at beat one of the preceding bar than to cue it exactly at beat three.
Try this short setup first:
- Choose an 8–16 bar phrase.
- Move the gauge one or two bars before the first lyric.
- Press Play backing once and check the starting note and breath position.
- When the cue feels right, use that same position for the next recording.
The cue does not need to sit at the very beginning of the song. Leave a longer lead-in when you are getting comfortable with the backing; keep it short when you are comparing timing. If you are unsure of the exact tempo, estimate the BPM with How to Find the BPM of a Song and, if needed, run Online Metronome separately to check the first beat.
Play under take — start the backing with the recording
Play under take decides whether the backing track will play during the next recording. It is on by default after you load a file. When you start microphone recording with it enabled, the backing seeks to the saved cue and begins playing with you. When you stop the take, the backing stops and returns to that same cue. This is what saves you from resetting the playback position by hand for every attempt at the same phrase.
Use Play backing when you only want to preview the accompaniment before recording. Turn Play under take off when you want the next take to contain only your voice without hearing the backing at record time. The distinction matters: “I heard the backing, so why did it not begin when I hit record?” usually happens when Play backing and Play under take are treated as the same control.
For a short example, imagine a 96 BPM pop chorus where “I can’t…” begins on beat two of the first bar. Set the cue to beat one of the previous bar and turn on Play under take. In the first take, listen only for whether the lyric arrives after beat two. In the second, take your breath slightly earlier and listen only for whether the consonant meets the drum. Comparing the two turns a vague issue such as “the high note feels unstable” into a more useful practice task: “the first consonant arrives 80–120 ms late.”
Voice only and Mix into take — decide what you need to save
Recording while hearing a backing track and putting that backing track into the saved take are different choices. Singing Recorder gives you two options.
Voice only: the default choice for practice and analysis
Voice only is the default. You hear the accompaniment through your headphones, but the saved take contains only your voice. This is usually the better choice when you want to check intonation, diction, breath, or rhythmic drift.
With only the vocal saved, the backing cannot hide a late entrance on playback, and you can compare the vocal against another backing file or metronome later. Whether you choose Voice only or Mix into take, Vocal Pitch Monitor, Vocal Spectrum, and Vocal Range Test analyze only the voice entering through the microphone. Mixing the backing into a take does not make the pitch graph mistake the accompaniment for your vocal.
Mix into take: when you want to keep a quick demo
Mix into take includes the backing track playing from the cue in the saved take. It is useful when you want to send a teacher or bandmate a short example of how you sang a phrase, or when you want to compare the same phrase over the same backing the next day.
This is a simple practice mix, not multitrack editing in a DAW. You cannot separately rebalance the vocal and backing levels after recording, so it is safer to save a Voice only take first when clear feedback is the priority. A practical routine is to make one Voice only take for analysis, then choose Mix into take only for an attempt worth keeping as a quick demo.
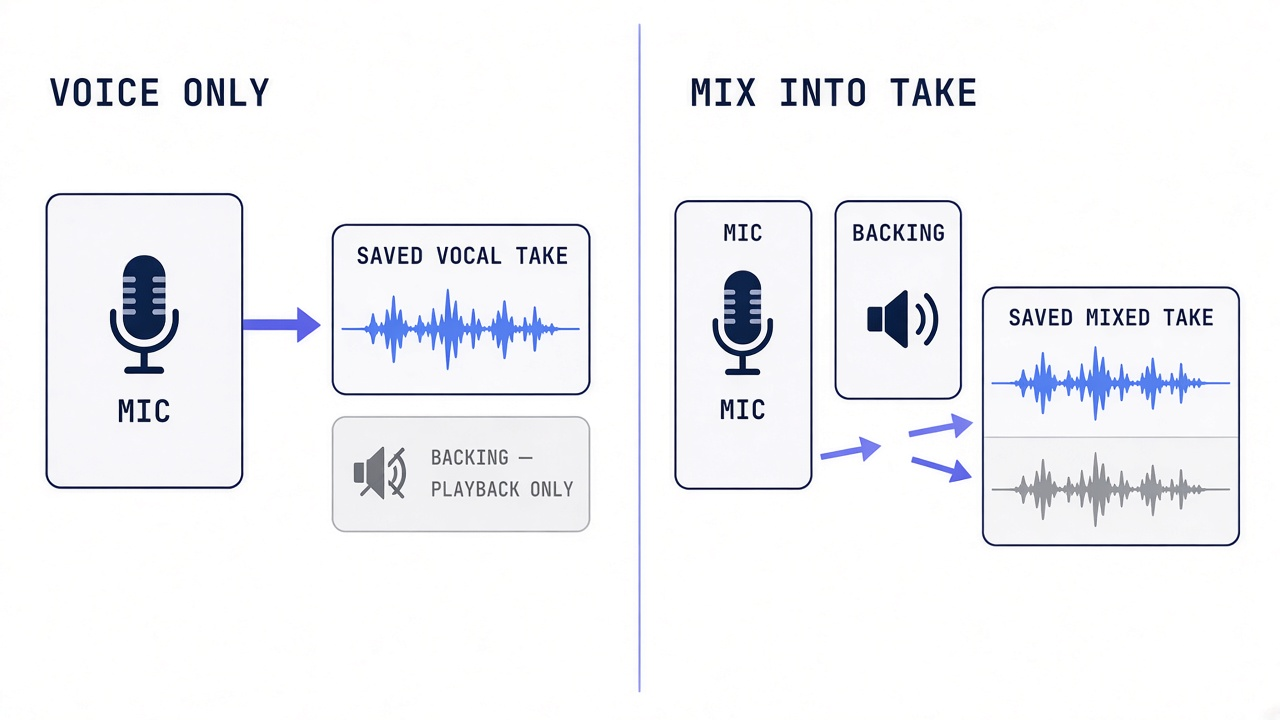
Voice only works best for analysis; Mix into take is useful when you need a short demo.
Backing-file storage and copyright: practice is different from sharing
The loaded backing file, cue point, and playback or mix selections are stored with your takes in the browser's IndexedDB, so they can be restored after a refresh or a move between tool pages. This temporary cache expires after about 24 hours. Download any practice result you need to keep longer. For the browser-storage model itself, see MDN's IndexedDB guide.
Loading a file from your device for private practice is different from uploading or distributing a take that includes accompaniment. A file saved with Mix into take may contain the backing audio. The U.S. Copyright Office explains that a musical work and a sound recording can be separate rights, and that you should check the permissions or licences needed for your intended use of someone else's audio. See What Musicians Should Know about Copyright for the underlying principles. Using a backing you made yourself, a track with a licence that expressly permits your use and sharing, or a file you have rights to is the simplest approach.
A 10-minute backing-track practice flow for one phrase
You do not need to record the whole song. Here is a 10-minute example based on the beginning of a chorus.
0–2 minutes — Check the file and cue: Open Takes and backing and load the accompaniment. Set the gauge one bar before the first lyric, then listen twice with Play backing. Lower the backing first if it is too loud.
2–4 minutes — Check the starting note and beat: Check the first note once on Virtual Piano and, if needed, set Online Metronome near the backing-track BPM. Do not push a high note here; only notice where the first consonant falls.
4–6 minutes — First Voice only take: Turn on Play under take, choose Voice only, and record 8–16 bars. On playback, listen for either the first consonant or the breath — not both.
6–8 minutes — Change one thing: Sing the two problem bars with the backing two or three times. If the note is unstable, check it in Vocal Pitch Monitor. If the rhythm drifts, prepare the breath before the starting beat.
8–10 minutes — Second take and comparison: Record again from the same cue. Keep Voice only for a practice record, or make one additional Mix into take version if you need a listening demo. When two takes differ, name the difference in one short note for the next session.
Start with MusicalBoard Singing Recorder
Open Singing Recorder and allow microphone access. Select the Takes and backing icon in the Controller strip, then choose Load backing in the Backing area. Drag the gauge to a cue one or two bars before the phrase and use Play backing to confirm the start. Turn on Play under take to hear the accompaniment while recording. Choose Voice only for an analysis take or Mix into take for a quick demo, then start recording.
Backing tracks do not produce a right answer in one attempt. Sing twice from the same cue and look for one difference between the takes. That small comparison gives the next practice session a much clearer place to begin.