
Mic Room Diagnostics checks your microphone and room in about a minute before you sing or record. It runs three checks in order — background noise, space ring, and voice input — then shows a report with a readiness score and a fix list. Everything runs in the browser; audio is not uploaded. This article covers what each check measures, what to look at on screen, and how to use it ahead of Singing Recorder or Vocal Pitch Monitor.
Before You Start
Thin vocals, hiss between phrases, thumps on “p” and “b,” or harsh distortion when you sing loud often trace back to room noise and mic gain, not a bad voice day. Bare walls add ring. AC and PC fans raise the noise floor (Noise floor — Wikipedia). Mouth too close or gain too high brings plosive bursts or clipping first.
If a laptop fan sits next to the mic, the pitch graph can look unstable even when your intonation is fine. Moving the mic or turning the fan off may help more than another scale run. Mic Room Diagnostics turns that into pass/fail numbers and a score. It is a quick practice-recording check with the gear you have now — not a studio acoustic survey (Reverberation — Wikipedia).
The Three Checks
The top progress row shows Noise · Reverb · Plosive. Work through them in order.
Check 1 — Background noise (5 seconds, silent)
Stay still and quiet for five seconds. The tool averages input level and shows a noise floor in dBFS. −45 dBFS or quieter passes (more negative is better). It also flags likely 60 Hz hum and fan-style broadband noise.
If this fails, room tone bleeds into quiet lines and decays. Try moving away from the PC, pausing HVAC, or tidying cables. Recording Your Voice in the Browser covers the same environment basics.
Check 2 — Space ring (one clap)
After you press start, clap once near the mic. The tool estimates decay time in milliseconds — how long energy hangs in the room. Under about 500 ms passes; longer decay reads as a ringy space for vocals.
Re-run after blankets, curtains, carpet, or a mic move and compare the number. Retry needed means the clap was not clear — try one louder clap.
Check 3 — Voice setup (5 seconds)
Say “Pa Pi Pu Pe Po” at a normal-to-loud practice volume.
- Input too low — peak never reaches a usable level → move closer or raise gain slightly.
- Plosive — strong low-frequency bursts on consonants → pop filter, mic angle, or a bit more distance.
- Clipping — samples near 0.98 full scale (−0.2 dBFS) → lower gain.
After a pass, move on to Vocal Spectrum or recording.
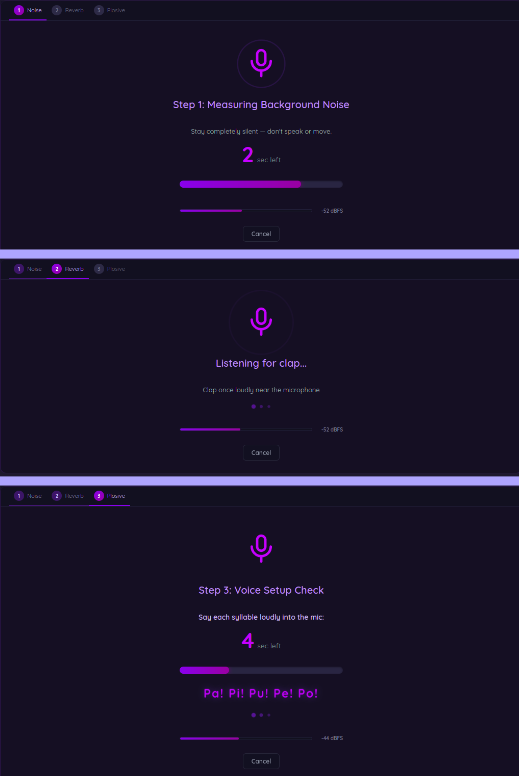
Background noise → clap decay → voice input, in that order.
Reading the Report
When Check 3 finishes, tap View Full Report.
- Overall score (0–100) and a short grade label (for example “Usable With Minor Tweaks”)
- Radar chart — all three areas at once
- Use-case bars — video call, streaming, podcast, and vocal recording (scored strictest)
- Summary grid — Noise Floor, Space Ring, Input Level, Plosive, Clipping
- Prioritised actions — biggest score hits first
- History — last ten runs (compare before/after moving the mic or adding soft materials)
- PNG or text export — before/after notes
For practice recording, watch the Vocal Practice bar; it is stricter than the video-call bar.
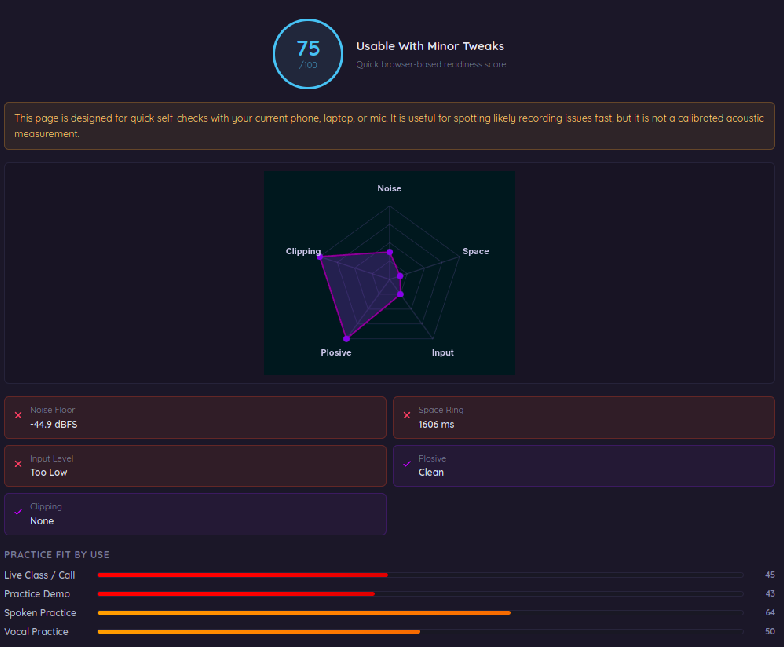
Pick one or two actions from the report and apply them before your next take.
How to Run It
- Open Mic Room Diagnostics.
- In Pitch Controls (mixer icon), choose your input device — especially if you have both built-in and USB mics.
- Stop header Singing Recorder recording or playback if it is active, then tap Allow Mic & Start Diagnostics.
- Run Check 1 (silent) → Check 2 (one clap) → Check 3 (Pa Pi Pu…). Watch the level meter for approximate dBFS while each check runs.
- Read the report, fix one or two items, and re-run if you changed the mic or room.
If Check 1 passes but Check 3 reports plosives, fix mic angle or distance and use Rerun on Check 3. If Vocal Pitch Monitor remains noisy, adjust its Pitch gate, check Low–High, and remove speaker bleed or background noise. Vocal Spectrum’s Spectrum floor changes a separate display and does not improve pitch detection.
A 2–3 minute slot at the start of a dashboard session works well — same slot as the opening of A 20-Minute Vocal Practice Session on the MusicalBoard Dashboard — before Singing Recorder or Vocal Pitch Monitor. Use headphones for monitoring; see Hearing Your Own Voice While Recording.